Vented Bottle Cleaning Simplified: Anti-Colic Care Made Easy

As a caregiver navigating the world of vented bottle cleaning, you've likely discovered that anti-colic bottle maintenance requires more attention than standard bottles. Those intricate vent systems designed to prevent gas and reflux can become frustrating cleaning puzzles when you're already sleep-deprived and time-pressed. The good news? Understanding how to properly care for these specialized bottles prevents residue buildup, ensures consistent flow, and most importantly, keeps your baby comfortable during feeds. I've observed countless caregivers struggle with disassembling, scrubbing, and reassembling these multi-part bottles, only to find mold hiding in crevices or experiencing inconsistent flow because components weren't properly cleaned. When vented bottle cleaning becomes overwhelming, even the most effective anti-colic system loses its benefits. Need a thorough walkthrough? Follow our step-by-step bottle cleaning and sterilizing guide for safe, efficient routines. Let me help simplify this essential part of your baby care routine so you can focus on what matters most: calm, comfortable feeding moments.
Why Anti-Colic Bottles Need Special Cleaning Attention
Anti-colic bottles differ from standard bottles because of their vent systems designed to prevent air ingestion. These systems often include multiple small parts (valves, vents, tubes, and chambers) that create pathways for air to escape around the milk rather than through it. When these pathways get clogged with milk residue, your baby may experience reflux, gas, or inconsistent flow that disrupts their natural feeding rhythm.
The frustration I hear most often isn't about the bottles themselves, it's about the complexity. Parents tell me they feel anxious about missing tiny components during cleaning, or they're worried about damaging delicate parts like the star valve in Tommee Tippee bottles or the internal vent in Dr. Brown's systems. This complexity leads to skipped sterilization steps, which ironically can cause more gas and discomfort, defeating the entire purpose of using an anti-colic bottle.
Remember: a clean vent system maintains proper flow pacing, which directly impacts how your baby accepts the bottle. Comfort cues during feeding (like relaxed jaw movement, steady swallowing, and minimal fussing) depend on consistent milk flow that only comes from properly maintained components.
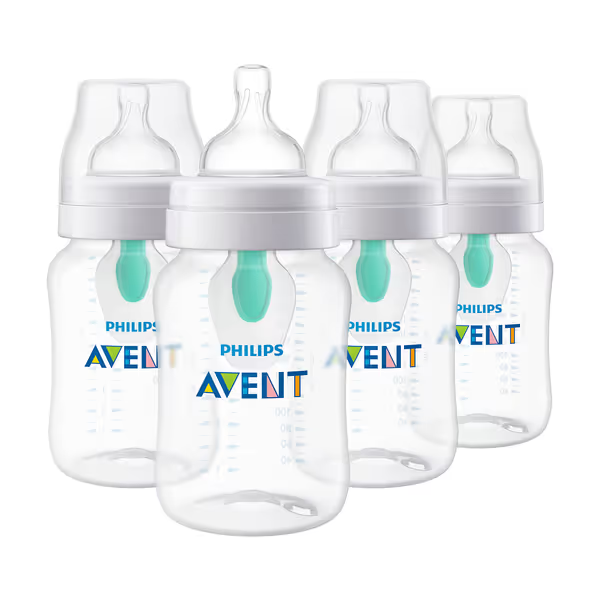
Philips Avent Anti-Colic Bottle (9oz, 4-Pack)
Mastering Vented Bottle Cleaning: A Caregiver's Practical Guide
The Golden Rules of Anti-Colic Bottle Maintenance
Before diving into brand-specific techniques, let's establish universal principles that apply to all vented bottles:
- Disassemble completely before cleaning. Every part that touches milk needs attention, especially those tiny vent components that hide in the collar or nipple base.
- Check for milk film under good lighting. Residue often appears as a cloudy film rather than visible chunks, especially in silicone parts.
- Never force brushes into delicate vent channels. Use the manufacturer's recommended tools (or gentle alternatives like pipe cleaners) to avoid damaging sensitive parts.
- Air dry components separately on a clean rack. Stacking parts while damp creates moisture traps where bacteria thrive.
- Inspect before every use. Hold vent components up to light to ensure pathways are clear, especially the star valve slit that needs to stay open for proper function.
Comfort first, then compatibility; calmer feeds shape better habits.
Cleaning Your Philips Avent Anti-Colic Bottle
The Philips Avent Anti-Colic Bottle with AirFree Vent features a brilliantly simple system: just three main components (bottle, vent, and nipple) that work together to prevent air ingestion. For performance data and cleaning quirks across models, see our Avent anti-colic comparison. What makes this system stand out for cleaning is its single-piece AirFree vent (no tiny tubes or multiple valves to track).
Cleaning process:
- Disassemble all three components immediately after feeding
- Use a standard bottle brush on the wide-mouth bottle (no special tools needed)
- Clean the single-piece vent by running warm soapy water through its channel
- Gently scrub the nipple base where it connects to the vent
- Air dry all components separately before reassembly
I love this system because it minimizes the "where did that tiny part go?" panic many parents experience with more complex bottles. During my observations, caregivers consistently reported that the simplicity of the AirFree vent made vent system hygiene feel manageable, even during middle-of-the-night cleanups. The wide neck accommodates standard brushes, eliminating the need for specialized complex bottle cleaning tools.
The single-piece vent design means fewer crevices for milk residue to hide, reducing the risk of bacterial growth that could affect your baby's comfort. When the vent channel stays clear, milk flows consistently, allowing your baby to maintain their natural feeding rhythm without gulping or fighting against inconsistent flow.
Dr. Brown's Options+ Narrow Bottle: Managing Multi-Part Bottle Care
Dr. Brown's bottles feature a more complex vent system with multiple components: the reservoir tube, blue one-way valve, and vent insert. This sophisticated system is clinically proven to reduce colic symptoms, but requires careful attention during cleaning to maintain its effectiveness. Curious how the glass narrow version performs for newborns? Read our Dr. Brown's Options+ Glass review.
Cleaning process:
- Fully disassemble all parts (bottle, collar, nipple, reservoir tube, blue valve)
- Use the wire cleaning brush specifically for the reservoir tube (replace brushes every 24 hours for hospital-grade cleanliness)
- Gently clean the one-way valve with a soft cloth, never force brushes into this delicate component
- Pay special attention to the nipple tip where milk channels connect to the vent system
- Allow all parts to air dry completely before reassembly
The key insight I've gathered from caregiver diaries is recognizing when the vent system isn't properly clean: inconsistent flow patterns during feeding, where milk suddenly stops and starts. This frustrates babies and creates feeding stress. When the reservoir tube is thoroughly cleaned, flow remains consistent, allowing babies to feed at their natural pace without fighting the bottle.

Dr. Brown's Anti-Colic Options+ Narrow Bottle
Comotomo: Simplifying Silicone Vented Bottle Cleaning
Comotomo's unique silicone bottles feature dual anti-colic vents positioned at the bottle's shoulder. The wide-neck design makes these among the most parent-friendly options for vented bottle cleaning, especially for those transitioning from breastfeeding who appreciate the breast-like feel.
Cleaning process:
- Disassemble the two-piece system (bottle and nipple/collar)
- Use your finger or a soft cloth to clean the dual vent channels, no special brushes required
- Focus on the nipple base where the vents connect to prevent milk buildup
- Wipe the inside of the wide neck with a bottle brush
- Air dry all components separately
What I particularly appreciate about this system is how the silicone material resists odor and residue buildup better than plastic alternatives. During my observations, caregivers with silicone-sensitive babies (those who reacted to plastic bottles) consistently reported fewer issues with milk film residue, making multi-part bottle care simpler despite the dual vent system.
The flexible silicone allows you to gently squeeze and flex components during cleaning, making it easier to verify that vent channels are truly clear. When parents can see and feel that components are clean, they feed with more confidence, and that calm transfers to baby during feeding.
Streamlining Your Anti-Colic Bottle Maintenance Routine
Based on thousands of caregiver observations, the most successful parents implement these practical strategies for simpler vented bottle cleaning:
Single-Change Experiments That Reduce Cleaning Stress
Rather than overhauling your entire routine, try one small change at a time:
- Immediate post-feed rinse: Simply running warm water through components right after feeding prevents milk from drying and hardening in vent channels
- Dedicated drying rack: Assigning a specific spot for drying components prevents misplacement of small parts
- Color-coded parts: Using different colored bottles for different caregivers helps prevent mix-ups during daycare transitions
- Strategic sterilization: Only sterilize components that touch milk (skip the outer bottle if using a sleeve)
Tools That Actually Help (And Those You Can Skip)
Many parents feel pressured to buy specialized complex bottle cleaning tools, but most vented bottles work perfectly with basic equipment: We tested brushes, racks, sterilizers, and warmers in our bottle accessories comparison to see what's actually worth it.
Essential tools:
- Standard bottle brush with rounded tip (for wide necks)
- Soft dishcloth or pipe cleaners (for vent channels)
- Dedicated drying rack
Often unnecessary:
- Specialized vent brushes (can damage delicate components)
- Ultrasonic cleaners (overkill for most home situations)
- Multiple brush sets (one quality brush handles most systems)
Remember: the goal isn't sterile-perfect components, it's consistently clean parts that support comfortable feeding. When vent system hygiene becomes overwhelming, babies pick up on caregiver stress, which affects their ability to settle into feeds.
When to Replace Parts: Safety and Comfort Indicators
Regular inspection during cleaning reveals when components need replacement. Look for these observable signs:
- Nipples: Smooth texture becomes sticky or tacky; visible wear around the base; hole size changes (milk streams rather than drips)
- Vent components: Cloudiness in clear parts that doesn't wash out; visible cracks or warping; residue that won't scrub away
- Collars/rings: Threads become loose or stripped; visible cloudiness that indicates micro-scratches
I once observed two babies in the same toddler room using identical bottles: one relaxed only when we widened the latch angle and slowed the flow; the other needed a narrower teat and faster pace. The difference came down to subtle component wear that affected flow consistency. Replacement isn't about schedules, it's about maintaining comfort through consistent flow.
Your Action Plan for Simplified Vented Bottle Cleaning
Start implementing these changes today to transform anti-colic bottle maintenance from a chore to a manageable part of your routine:
- Tonight: Disassemble your bottle completely and hold each component up to the light. Check for any milk film you might have missed before.
- Tomorrow: Try the immediate post-feed rinse technique, just warm water through all components before setting them aside.
- This week: Assess which components actually need daily sterilization versus just thorough cleaning.
You don't need to overhaul your entire system at once. One change at a time creates sustainable habits that support both your baby's comfort and your peace of mind. When vented bottle cleaning becomes predictable and manageable, you'll notice calmer feeding sessions, fewer gas issues, and more confident bottle acceptance, because clean components support consistent flow, which respects your baby's natural feeding rhythm.
The most successful caregivers I've worked with share one trait: they focus on observable comfort cues during feeding rather than chasing perfect cleaning standards. Watch how your baby settles into feeds, notice their swallowing pattern, and observe their demeanor after feeding. These cues tell you more about whether your cleaning routine is effective than any checklist ever could.
Remember: comfort cues predict acceptance better than labels or marketing tiers. When your vented bottle cleaning routine supports consistent flow, you're not just maintaining equipment, you're creating the conditions for calm, efficient feeding that nurtures both baby and caregiver.
Related Articles


Small Space Bottle Storage: Sanitary Solutions for Apartments

How Bottle Materials Preserve Breastmilk Nutrients

Bottle Feeding Gut Health: Science-Backed Microbiome Support
